If you have searched for a “no-pull dog harness that works,” you have probably already bought one that… mostly didn’t. You are not alone. On dog forums, the same pattern shows up every few weeks: someone asks for the easiest no-pull harness, a pile of brand names appears, and then a quieter comment lands the truth — a harness can change the physics of a pull; it cannot teach your dog that walking next to you is the better job.
This guide is for that middle ground. We will talk about what “no-pull” usually means, how a front clip actually helps, how to fit a harness so it does not fight your dog’s shoulders, and a short walk drill you can try this week. Soft product notes at the end — no fake “tested with 47 dogs” claims, no countdown timers.
What “no-pull” usually means (and what it doesn’t)
Most harnesses sold as “no-pull” do one or more of these things:
- Offer a chest (front) leash ring so a forward pull turns the dog slightly sideways instead of letting them lean into the full power of their chest.
- Use a Y-shaped front that sits between the shoulders rather than a strap that runs straight across the chest and can restrict natural stride.
- Add padding and a top handle so you can steady a dog at a curb, on stairs, or when something exciting appears.
What they do not do:
- Erase the habit of forging ahead.
- Replace loose-leash training.
- Make every dog comfortable on day one (especially if the fit is wrong).
Think of the harness as a translator: it makes “pulling hard” a less rewarding strategy while you teach a better one. If you only change the gear and keep the same walk pattern, the pull often returns — or the dog simply learns to side-step forward.
Front clip vs back clip, in plain English
Back clip (dorsal ring): Feels familiar. Many dogs pull into a back clip because the pressure lines up with their strongest forward drive. Fine for calm walkers, hiking when you want a steady tow point, or after loose-leash skills are solid.
Front clip (chest ring): When the dog surges, the leash pressure comes from the front and encourages a turn toward you. Walks can feel a little zigzaggy at first. That awkwardness is often the point — it interrupts the “tractor beam” toward the next smell.
Some people clip to both rings with a dual-clip leash while training. Others use front clip in busy neighborhoods and switch to back clip on quiet trails once manners improve. Neither choice is moral; both are tools. For a deeper comparison, see our front-clip vs back-clip guide.
Practical tip: If front-clip walking feels chaotic, shorten the leash enough that you can feel the first ounce of tension early — then respond before the dog hits full speed.
Fit that doesn’t fight the shoulders
A no-pull design fails fast when it sits wrong. Before you blame the product, check these:
- Chest strap location. On a Y-front harness, the center of the Y should rest on the breastbone area, not ride up into the throat and not slide so low that it presses on the soft abdomen.
- Shoulder clearance. You should see the front legs swing without a horizontal strap chiseling into the shoulder joint on every step.
- Two-finger rule (as a starting point). Slide two fingers under each major strap. Loose enough for comfort, snug enough that the harness cannot rotate when the dog lunges.
- No twist after three steps. Buckle up, walk a few paces, stop, and look. If panels have spun or a buckle is digging behind a front leg, adjust again.
- Escape artists. Dogs who back out of gear need a snugger neck fit and careful buckle checks — not a larger “roomy” size. When in doubt, measure and ask before you order.
If you want a step-by-step put-on sequence, use our how to put on a dog harness walkthrough, then come back to the training piece below.
A 10-minute walk drill (tool + training)
You do not need an hour-long session. You need clean repetitions.
- Start indoors or in a quiet driveway. Clip to the front ring. Mark (click or a short “yes”) and treat when the leash stays soft for even two steps.
- Walk three to five steps, then stop. If the dog hits the end of the leash, become a tree. Wait for slack or a look back, mark, treat, then move again.
- Change direction on purpose. When you feel the first pull, pivot away. Reward the dog for catching up beside you — not for dragging you to the pivot.
- Raise the bar slowly. Move to a low-distraction sidewalk before you try the route past the dog park fence.
- End while it is still going well. One short success beats a long frustrated loop.
Carry treats in a waist pack or pocket so you are not fishing in a bag while the leash goes tight. A simple walking waist pack keeps rewards and waste bags where your hands expect them.
Honest caveat: Adolescent dogs, scent hounds, and powerful working breeds may need weeks of this, not one weekend. The harness makes those weeks safer on your shoulders. It does not compress the calendar.
When a top handle actually helps
A grab handle is not for casually lifting a large dog (and you should not assume any walking harness is rated for that). It is useful when you need close control for a few seconds:
- Crossing a busy street when a skateboard appears
- Holding position on a narrow trail while other hikers pass
- Guiding a dog into the car without a full-body wrestle
- Steadying a startled dog until the leash is shortened
If your walks include those moments, a padded handle on a sturdier walking harness earns its place. Our tactical walking harness with handle and MOLLE panels is built for that kind of everyday control on medium and larger dogs — confirm chest and neck measurements with us before you pick a size, because published ranges for that model should be verified against your dog.
Mistakes that make any harness feel useless
- Buying for the photo, not the chest shape. Deep-chested, athletic, or small-headed mixes often need more adjustment points than a one-size “vest.”
- Leaving the leash long and hoping the front clip “does something.” Late corrections feel like random yanking to the dog.
- Switching gear every three days. Dogs need consistency to learn which behaviors pay.
- Using a harness as a car restraint without checking what it is designed for. Walking gear is walking gear. Pair car rides with a purpose-built tether or crate strategy, and never assume a seat cover or fashion harness is crash-tested.
- Skipping the reward. If the only feedback is pressure, the walk stays adversarial.
A calm product note (no scarcity theater)
If you want a single walking setup to practice with:
- Start with a well-fitted no-pull style walking harness you can adjust and, if needed, hold close with the handle.
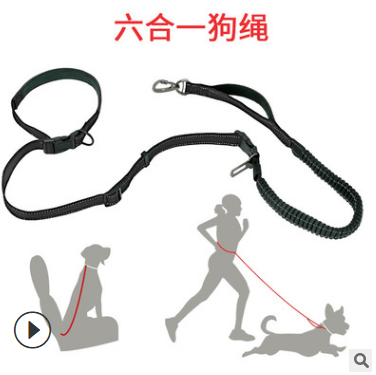
- Pair it with a leash you can shorten quickly — a multi-function leash gives you traffic-length and standard walk options without carrying three leads.
- Keep treats accessible in a waist pack.
Measure first. Ask us if your dog is between sizes. Return policies exist for a reason — read them before you buy, not after a frustrating first walk.
FAQ
Do no-pull harnesses really work?
They can reduce how effectively a dog can pull you forward, especially with a front clip and a correct fit. They do not permanently “cure” pulling without training. Expect a management tool plus a teaching plan.
Is a front-clip harness bad for my dog’s joints?
A strap that sits tightly across the shoulders and blocks natural movement is a poor long-term choice. Prefer designs that leave the shoulder area freer (often described as Y-shaped or A-line on the chest), fit them carefully, and watch for rubbing. If your dog has a medical issue, ask your veterinarian or a qualified trainer before changing gear.
Should I use a front clip forever?
Not necessarily. Many handlers use front clip while building loose-leash skills, then use a back clip for calmer routes or hiking. Keep the option that matches the day’s distractions.
My dog still pulls in a no-pull harness. What now?
Check fit first. Then shorten the leash, slow the session, and reward slack. If pulling is explosive or tied to fear/reactivity, work with a force-free trainer — equipment alone is the wrong primary plan.
EasyWalk-style vs tactical/Y-front — which should I buy?
Choose based on chest shape, how often you need a handle, and whether you want a short-term training aid or daily trail gear. There is no single winner for every dog. Measure, read the product page for that model, and confirm clip configuration if a front ring is required for your training plan.
Can I use the same harness in the car?
Only if the product is designed and documented for vehicle restraint — and even then, follow the maker’s instructions. Many walking harnesses are not crash-tested. Use a dedicated car tether or crate when safety is the goal.
Designed for Pets. Made for the Journey. — PawFurvia field notes for people who would rather walk well than buy another unused gadget.